At this point, you have general overview of shaders. This tutorial is aimed at teaching some useful tricks for optimizing, error checking and some useful code snippets. Feel free to just play around with shaders and come back to this later if you're not ready.
Optimization
When I was first learning about shaders, it was difficult for me to tell what code was efficient and what would be slow. After all, you can't easily run code on thousands of pixels in GML, but shaders can with ease. At the same time many shaders can struggle with if-statements and for-loops, while GML has no such problem. So that's what I'd like to cover now.
Tips
So here's a list of things to consider.
-
Expressions: If you have to compute a mathematical, for example:
float PHI = (sqrt(5.)+1.)/2.;consider pre-calculating the answer instead. In this case, approximately 1.618034. Sometimes you need to compute a complex expression with changing variables (e.g. sunlight color based on the sun position). If this expression is the same across all pixels, then try calculating this outside the shader and passing it in as a uniform. The CPU is more going to be more accurate anyway!
Also, stay aware of variable precision. This is especially important for mobile devices! Color variables probably don't need to be highp. -
Vertex or Fragment: While we're on the subject of expressions, maybe you can move some of your computation from the fragment shader to the vertex shader. This is generally faster because there are many more pixels/fragments than there are vertices so you may be able to calculate your lighting shader once per vertex rather than per pixel.
Just remember that varying values will be interpolated across the mesh, so it's not always usable. -
Vectors: A small, but easy optimization to implement is using vectors a lot. Instead of doing:
Just use a vec2:float texel_width = 1.0 / resolution.x; float texel_height = 1.0 / resolution.y;vec2 texel_size = 1.0 / resolution;
This tends to be faster, often making the code more concise and readable. Remember, shaders are very good at computing in parallel, so if you calculate multiple components simultaneously with vectors, do that! Don't be afraid to use swizzling wherever necessary! -
Loops: Modern GPUs can handle a lot loop iterations, but if you're targeting non-desktop platforms (especially mobile) or low-end PCs you should be careful. Things like texture sampling can use a lot of bandwidth so 8 texture samples is a generally safe upper limit on low-end hardware.
If your loop can be "broken" early, make sure to do that. For example, if I'm looping through a list of lights, I can stop at the last light:
if (i > light_num) break; -
Branching: You may have heard that you should always avoid if-statements in shaders. This is not necessary and in many cases if-statements are faster than alternatives!
The thing is, GPUs are optimized for highly parallel computations. This means that many pixels are computed simultaneously and are running the same code, so if you have a lot of complex operations that apply to specific pixels, it may be run on the entire group and discarding the unused parts. -
Textures and multipass: Sometimes you can pre-calculate complex operations on to a texture and input that to the shader via uniforms. For example, if you have a costly noise function, it might be faster to save it to a sprite instead and pass it to the shader as a uniform.
In some cases, you may have an effect that would be faster if you do it in multiple passes, drawing the result of one shader to a surface and passing that into the next shader. For example, let's say you have a 9x9 box blur. Doing that in one pass requires 81 samples which is quite slow on older hardware! Instead you can do a 9x1 blur, drawing that to a surface and then applying a 1x9 blur to finish it off totally only 18 samples (77% fewer)!
Preprocessor
The preprocessor is used to "process" the shader code during compilation (not runtime). For example, with #define, you can define a macro value, let's say 'pi', and it will replace all references of 'pi' with that value (just like GML macros). Every time you run the game, the preprocessor will compile those changes as though you hardcoded those values in, making it a good choice for values you may want to change later.
Here's a list of the supported preprocessor directives:
#define, #undef, #ifdef, #ifndef, #if, #endif, #else, #elif,
So you know that '#define' can define a value like constants, but, like GML macros, it can also hold expressions such as #define add a + b or you can use it like a function with custom values like: #define add(a,b) a + b.
Note: This code directly replaces its references, so you probably don't want to put a semi-colon at the end of your expression, if you already have one on that line! And since it's like copy-pasting, you'll want to make sure you're not repeating computations that only need to be done once.
The next directive is '#undef', which as you may have guessed, can be used to undefine macros, which can be used to avoid naming conflicts. '#ifdef' and `ifndef` are preprocessor if statements to check if a macro is defined (or not, respectively). Instead of brackets, you use '#endif' to close the statement, and any lines in between will be discarded (during compile) if the condition is false. Some people like to leave optional bits of code in their shader that can be toggled on with a define.
Next is '#if', which can be used for standard conditionals (e.g ==, >, etc). Just make sure the terms in the condition are constant values, macros!
And finally, you have '#else' and '#elif' which work how you'd expect, being an else statement and else-if respectively. To recap, here's a quick example:
#define mode 0 //Try changing this to 0, 1 or 2.

#if (mode == 0)
color *= vec3(1.0, 0.0, 0.0); //Multiply "color" by a red filter.
#elif (mode == 1)
color *= vec3(0.0, 1.0, 0.0); //Mulitply by a green filter.
#else
color = color.rrr; //Use mono-color from red channel.
#endif

#undef mode
So that's how you can make your code more customizable without taking runtime performance! You'll thank yourself later for not leaving magic numbers everywhere.
Useful Code and Math
Here are some useful pieces of code that should help you get started!
Colors and brightness
For some effects (like sepia-tone or grayscale) you need to compute the brightness of a color. I'll go over the two most common approaches.
 On the left is the original color for reference, the middle is the RGB average and the right is a weighted average.
The first approach is to simply compute the average of the red, green, and blue channels:
float average = (color.r+color.g+color.b)/3.0;The second approach is to approximate "perceptive" brightness. For example, lime green appears brighter than blue even if they have the same RGB average. So instead of giving red, green, and blue the same weight, we'll give green a higher weight and blue a lower weight:
float weighted = dot(color.rgb, vec3(0.2126, 0.7152, 0.0722));Gamma correction
One thing you might not know is that 50% brightness (or 0.5 RGB) is not displayed at 50% brightness on your monitor. Instead, it's displayed at around 73% brightness because the output is not linear.
 On the top is a linear-gradient, and the bottom is gamma corrected. Notice the top, middle section looks too bright.
//Useful on textures because they are already gamma-encoded.
vec3 decode = pow(color.rgb, vec3(0.4545));
//Useful with linear gradients or lighting. It should be the last step.
vec3 encode = pow(color.rgb, vec3(2.2));Texture coordinates
For many effects, you need to work directly with texture coordinates and texture pages can make the more difficult.
For example, say you want write a gradient shader where the sprite's alpha fades to 0 at the bottom.
The easy answer would be to use the texture coordinates because they range from 0 to 1 across the texture page.
Texture coordinate normalization.
uniform vec4 sprite_uvs; //uvs [x, y, w, h]
//Use sprite_get_uvs() to get the coordinates of the top-left and bottom-right corners:
//Example: var uvs = sprite_get_uvs(sprite_index, image_index);
//You can get the texture coordinate range as the difference between them:
//Example: shader_set_uniform_f(uni_uvs, uvs[0], uvs[1], uvs[2]-uvs[0], uvs[3]-uvs[1]);

//Map the texture coordinates to the range 0 - 1 ("normalized").
vec2 texcoord_normalize(vec2 coord)
{
    return (coord-sprite_uvs.xy)/sprite_uvs.zw;
}
//Map normalized texture coordinates back to the original range.
vec2 texcoord_unnormalize(vec2 coord)
{
    return coord*sprite_uvs.zw+sprite_uvs.xy;
}
Three noise functions
So if you skim over shader websites like ShaderToy you've probably seen various types of noise come up a lot. Noise can be used to make your effect look more natural and chaotic. It's perfect for fog, water, terrain, clouds and much more so it's definitely something to go over. In a future tutorial, I'll go over noise in more detail, but for now I'll go over three basic types to get you started:
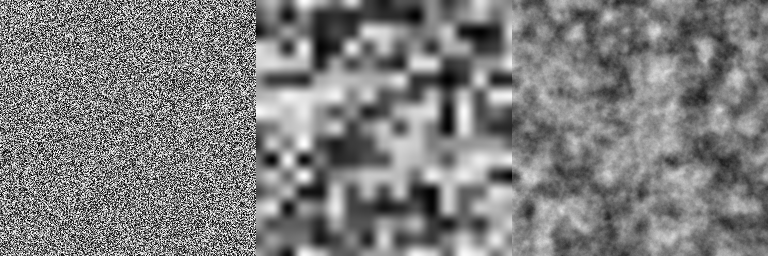 White noise, value noise and fractal noise respectively.
//Typical pseudo-random hash (white noise).
float hash(vec2 p)
{
    p = mod(p, 7.31); //Bring 'p' to a useful range.
    //Generate a pseudo random number from 'p'.
    return fract(sin(p.x*12.9898 + p.y*78.233) * 43758.5453);
}
//Standard value noise.
float value_noise(vec2 pos)
{
    vec2 cell = floor(pos); //Cell (whole number) coordinates.
    vec2 sub = pos-cell; //Sub-cell (fractional) coordinates.
    sub *= sub*(3.-2.*sub); //Cubic interpolation (comment out for linear interpolation).
    const vec2 off = vec2(0,1); //Offset vector.

    //Sample cell corners and interpolate between them.
    return mix( mix(hash(cell+off.xx), hash(cell+off.yx), sub.x),
                mix(hash(cell+off.xy), hash(cell+off.yy), sub.x), sub.y);
}
//Generate 'fractal' noise from multiple value noise octaves.
float fractal_noise(vec2 pos, int oct, float amp)
{
    float noise_sum = 0.; //Noise total.
    float weight_sum = 0.; //Weight total.
    float weight = 1.; //Octave weight.

    for(int i = 0; i < oct; i++) //Iterate through octaves
    {
        noise_sum += value_noise(pos) * weight; //Add noise octave.
        weight_sum += weight; //Add octave weight.
        weight *= amp; //Reduce octave amplitude by multiplier.
        pos *= mat2(1.6,1.2,-1.2,1.6); //Rotate and scale.
    }
    return noise_sum/weight_sum; //Compute average.
}If you don't understand what's going on in the code, don't worry! I'll go through this in more detail later! Hopefully this is enough to get you experimenting though!
Fixing Errors
Error messages... Everyone hates seeing them. What does Fragment Shader: shd_example at line 3 : '' even mean? Well now let's go over the different error messages and how to interpret them. The first thing to know is that the error line is off by one or two. Too be safe, check a couple lines above where the error occured.
Here's a quick list of the error messages:
- ' ': This is the generic error whenever the shader compiler doesn't know how to interpret something. It can come from a missing semicolon, an extra comma, etc. If you misuse an operator, the error message will contain that operator.
- 'assign': Assignment errors come from trying to set a variable to a value of the wrong data type. Setting gl_FragColor, which is a vec4, to a vec2 value will surely cause a compile error!
- 'return': Return errors are similar to 'assign' errors. If a function expects to return a float, but returns an int instead, it will cause this error.
-
'constructor':
This error means you are setting too few or too many values in your constructor (e.g. vec2(1,2,3,4)).
Fun fact: you can actually overload a constructor if the last argument is a vector with too many components. The extra components will just get discarded. For example: int(vec2(1,2)) would return 1. - 'FUNCTION_NAME': If the error message contains the name of a function it can mean one of two things: Either it's overloaded or it doesn't exist. Double check for typos! It happens to all of us.
- 'VARIABLE_NAME': When an error message contains a variable name that means it wasn't set properly. Make sure you defined it earlier and that it's in the correct scope.
- 'KEYWORD': And finally there are a few keywords that you can't use as they are reserved for other versions of GLSL ES. Things like 'input', 'output' and 'flat' are reserved words that can't be used as variables or functions. You can find a full list of reserved keywords here.
Draw failed due to invalid input layout
This means you are trying to use an attribute that has not been defined on the vertex buffer object (example: trying to use texture coordinates on draw_circle). You may have to create separate shaders for different vertex formats.
Shader Extensions
An underrated feature of GLSL ES is shader extensions. This gives you access to extra features that didn't make it into the full shader release.
You can enable an extension like so:
#extension extension_name : require- GL_OES_standard_derivatives: This adds 3 functions which are native to newer versions of GLSL: dFdx, dFdy and fwidth. dFdx gives you the x-derivative of value (e.g. dFdx(GL_FragCoord.x) = 1.0). dFdy is the y-derivative and fwidth(a) is equivalent abs(dFdx(a)) + abs(dFdy(a)).
- GL_EXT_frag_depth: Adds a variable, gl_FragDepthEXT, for setting the depth in the fragment shader. This value is normalized so 0.0 = front and 1.0 = back. Note: fragDepth is slow on some hardware just like discard.
Interesting macros
Finally there are some built-in shader macros which may be useful! When you compile your GLSL ES shader in GameMaker, it may be converted to GLSL, HLSL or PSSL depending on the platform you're compiling for. For Windows, UWP and Xbox One, it will compile to HLSL 11, for Mac or Ubuntu, GLSL, for PlayStation 4, PSSL and GLSL ES for everything else.
There are four macros for these languages: _YY_GLSLES_, _YY_GLSL_, _YY_HLSL11_, _YY_PSSL_
So if you want to add extra code for only Windows, you can use the pre-processor to check if '_YY_HLSL11_' is defined.
You can also check the shader version using '__VERSION__'. As of 2024, this will always be "100" but it could change in the future.
Summary
So here's a quick summary of what we covered here: Optimize your code for parallel computation (avoid complicated edge cases). If your variables can be pre-computed or computed less often, do that.
You can use the pre-processor for adjustable shader parameters that don't add any runtime cost. This also is perfect for magic numbers that are referenced all around the shaders.
RGB color perception is a bit complicated, lime, vec3(0,1,0), appears brighter than blue, vec3(0,0,1). Also vec3(0.5,0.5,0.5) is not half as bright as vec3(1,1,1), but a bit brighter due to how brightness is encoded.
Error messages point to the wrong shader line (being 2 lines below).
Finally there are some useful shader extensions and built-in macros to play around with.
I hope you learned something interesting, even if you are an intermediate shader programmer. I want this website to be the source I didn't have when I was learning about shaders, so please consider sharing this with others if you found it helpful!