Welcome to GM Shaders!
These shader tutorials were carefully written with beginners and amateurs in mind, however, this can be a difficult topic. I advise taking your time when reading through them and take as many breaks as you need. They are designed to be comprehensive, yet concise which means you may not want to skip over anything unless suggested, or you'll miss something important! I avoid repeating myself wherever possible to keep these short. Throughout the tutorials, you will find highlighted text which contains additional information. Thanks for reading!
Tutorial Introduction
This first tutorial covers the basics of shaders in GameMaker. Make sure you have an understanding of coding in GML as I won't explain it here. If you are already familiar with the purpose and setup of shaders, then feel free to skip to the next tutorial.
Shaders are used to produce all kinds of graphical and visual effects for 2D or 3D.
They are perfect for enhancing any game's visuals.
You can use them for anything from color effects like grayscale, sepia tone to blur effects, to lighting effects like normal maps, shadows
to water reflections/refractions, shockwaves, wind, and much more!
Let's get started from the very beginning by looking at texture pages in GM.
Texture Pages
Before we get to the shaders, I want to explain a bit about texture pages (also known as a texture atlas) and how draw_sprite() works in GM.
First, when you run your game, all textures including, sprites, fonts, are placed on texture pages.
In summary, a texture page takes trimmed-down sprites and fits as many as possible on a single page. You can
read more about texture pages here.
Additionally, you can assign sprites to specific texture pages in the settings or use the "Separate Texture Page" option to put one on its own texture page.
That means drawing a sprite is actually just drawing a part of a larger texture page:
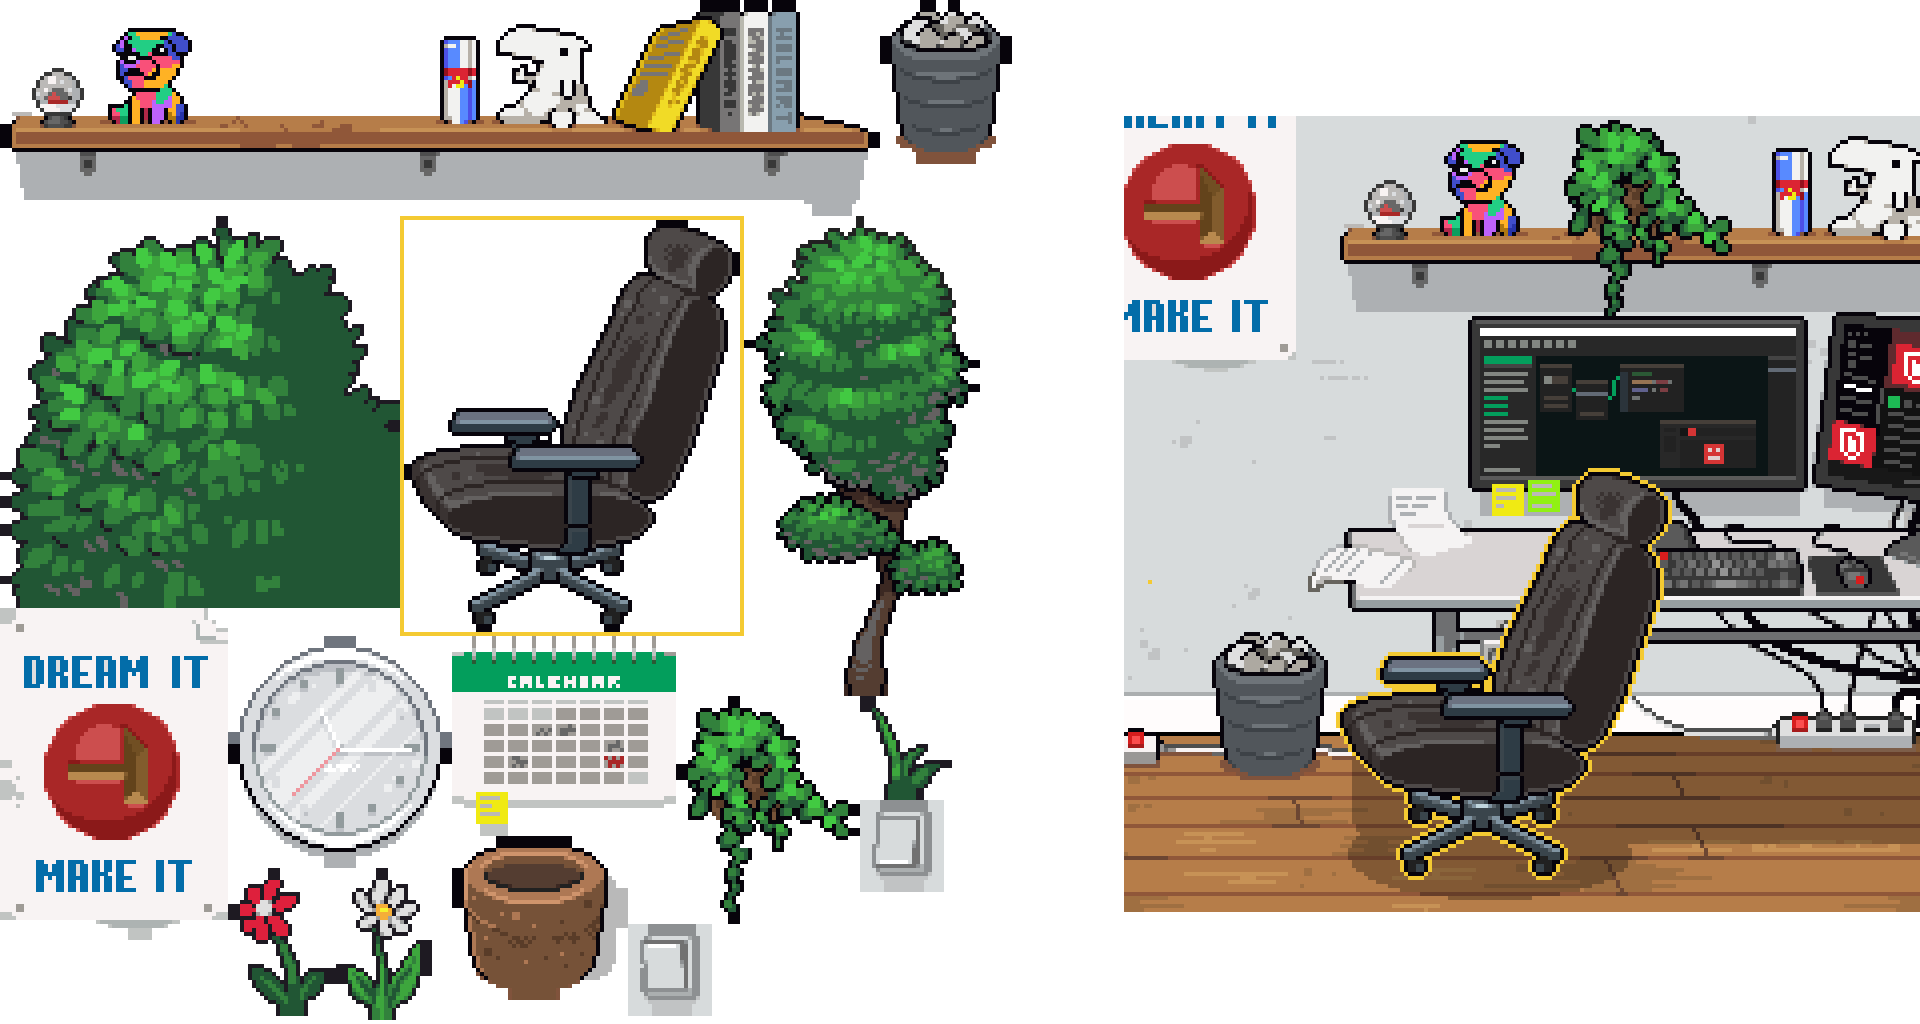 On the left you can see the texture page, on the right is how it looks in game. Sprites by JstFredrik
Drawing Sprites In GM
When you draw a sprite, it is actually drawing two triangles together which form a rectangle (quad).
Each vertex carries information such as its position, texture coordinates, and color.
So the vertices' positions are in the corners of the sprite.
The texture coordinates of the whole texture page range from 0 to 1.
So 0,0 is the top-left corner of the texture page and 0,1 is the bottom-left corner.
Typically a sprite's texture coordinates will be somewhere in the middle of the texture page.
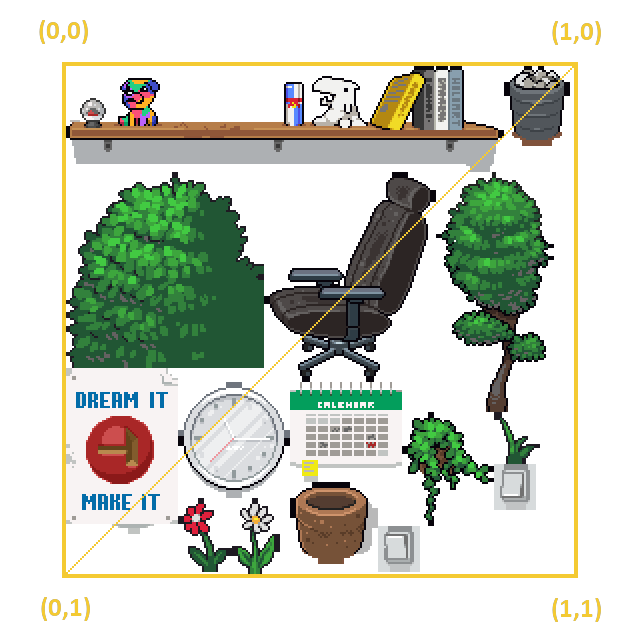 The whole texture page ranges from 0 to 1, while individual sprites lie within a smaller range.
When you use draw_sprite_ext() it sets the color and alpha of all the vertices in the sprite.
If you've used vertex buffers or draw_vertex_* functions you'll probably know that you can change the colors of individual vertices
and you can use this to create gradients and other effects.
Understanding this helps with shaders because these are the inputs the shaders have to work with.
How Shaders Work
Shaders are graphical programs run on your GPU that handle drawing of sprites, surfaces, vertex buffers, etc. GM supports two types of shaders: the vertex shader and fragment shader (sometimes called pixel shaders).
- The vertex shader handles each vertex. It can be used to move vertices, change the colors and more.
- The fragment shader handles each fragment and pixel. It's used for most effects, including texture or color effects.
When you don't apply any shader, GM uses a default "passthrough" shader. This passthrough shader outputs the texture with the draw color and alpha the way you're used to. It also handles things such as alpha testing and fog/lights in 3D, but that is for another time.
Shaders process all vertices simultaneously and then all the pixels. This means that any conditional effect (dependent on a specific area, time or any other variable) will perform slower since all vertices/pixels use the same code despite varying results.
Adding a Shader
Right-click the shaders folder and select "Create Shader" or press ALT+A. I'll title mine "shd_passthrough" because this is going to be just another (simplified) passthrough shader. If you right-click the shader in the resource tree, you have three options to choose from:
- GLSL ES is compatible with all platforms.
- GLSL is compatible with Mac and Ubuntu.
- HLSL 11 is compatible with Windows, UWP and Xbox One. Also supports MRTs which I will cover later.
For now, we will just use GLSL ES because it is fairly standard and can be used on all platform targets.
Passthrough Shader Explained
I've gone through the default vertex and fragment shader, but I replaced the comments with my own. This will give a basic explanation of what each line does, but don't worry about the details just yet. Vertex shader code quickly explained:
//Receive the input positions (x,y,z/depth) of the vertices.
attribute vec3 in_Position;
//Receive the input color (red, green, blue, alpha) of the vertices.
attribute vec4 in_Colour;
//Receive the input texture coordinates (u,v) of the vertices.
//u,v are the x,y of texture coordinates, but called u,v to avoid confusion.
attribute vec2 in_TextureCoord;

//Pass the texture coordinates to the fragment shader.
varying vec2 v_vTexcoord;
//Pass the vertex color/alpha to the fragment shader.
varying vec4 v_vColour;

//Handle vertex.
void main()
{
    //Create a vector for the vertex position and translation amount (1.0).
    vec4 object_space_pos = vec4( in_Position.x, in_Position.y, in_Position.z, 1.0);
    //Output the vertex position (in projection-space).
    gl_Position = gm_Matrices[MATRIX_WORLD_VIEW_PROJECTION] * object_space_pos;

    //Set the vertex color/alpha to be passed to the fragment shader.
    v_vColour = in_Colour;
    //Set the texture coordinates to be passed to the fragment shader.
    v_vTexcoord = in_TextureCoord;
}
Fragment shader explained:
//Pass in the texture coordinates from the vertex shader.
varying vec2 v_vTexcoord;
//Pass in the vertex color/alpha from the vertex shader.
varying vec4 v_vColour;

//Handle fragments/pixels.
void main()
{
    //Set the output the vertex color multiplied by texture color of each pixel.
    gl_FragColor = v_vColour * texture2D( gm_BaseTexture, v_vTexcoord );
}
Using a Shader
Okay, so now you have a shader, but how do you use it? Well, you just have to set it, draw anything that you want the shader effect to apply to (surfaces, sprites, etc) and then reset it when you're done to resume normal drawing. Here's an example:
//Begin drawing with the shader effect.
shader_set(shd_passthrough);
//Draw code for the shader goes here (e.g. draw_self, draw_surface, etc).
draw_surface(application_surface,0,0);
//Disable the shader.
shader_reset();
This way you have full control what each shader applies to. Sometimes I need separate shaders for separate objects (e.g. a wind shader only for foilage) and using draw_self with a shader works neatly.
Shaders also work great with GM's surfaces especially for effects that apply across multiple objects or screen effects (e.g. motion blur or bloom).
Summary
Congrats on creating and examining a shader!
For many, matrices and vertex positions look quite complicated, but that's okay!
Don't worry too much about the details as the next tutorials will break the process down into bite-sized pieces.
For now, I hope you learned something interesting and are looking forward to writing your own shaders.