Today we'll go over brightness, contrast, hue shifting, converting between the RGB and HSV color spaces and LUT color grading.
If you are looking for an example project to follow along with this tutorial then feel free to use the GM Shaders Base project and have a look at the code. You can also make some changes and play around a bit!
Brightness and Contrast
Brightness and contrast are two basic properties of an image. Brightness refers to the overall "lightness" of an image. Contrast refers to the difference in brightness between the brightest and darkest elements.
The main code to adjust brightness and contrast is fairly basic:
color.rgb = mix(vec3(0.5), color.rgb + u_brightness - 1.0, u_contrast);
gl_FragColor = v_color * color;vec3(0.5) means a color of 50% gray, in GameMaker this corresponds to the built-in c_gray color constant.)A value of 1 is subtracted from
u_brightness. As a result passing a value of 1 for brightness will give no change.
 Increasing brightness by .25 at a time going from to left to right.
The contrast is constant at 1.0.
 Increasing contrast by .25 at a time from left to right.
The brightness is constant at 1.0.
Food For Thought (1) If you leave the contrast unchanged (u_contrast is set to 1), which is the highest value for brightness that still makes a visual difference? Why is that?
Hue, Saturation and Value
HSV, which stands for hue, saturation and value, gives a different way to represent colors.
The hue of a color refers to the way that we perceive colors as humans. You can see that in the order of the colors, they (almost) correspond to a rainbow: red, orange, yellow, green, blue, indigo, violet. (Notice how red, green and blue are still in that order (R, G, B))
Almost, since the difference between reality and the representation as hue is that hue wraps around. While a rainbow's colors stop at violet, hue is constructed such that it goes back to red; both a hue of 0 and a hue of 1 correspond to pure red.
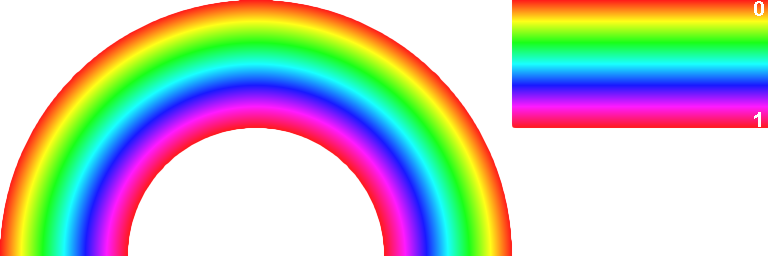 On the left a rainbow drawn by varying the hue from 0 to 1 from the center of the image to the outside.
On the right the same colors with the values for hue (drawn with a saturation of 0.9 and a value of 1.0).
Saturation and value are the two other components of a color represented as HSV. Saturation is the amount of the color and value is the brightness of the color.
Converting between RGB and HSV
The relationship between RGB and HSV may not seem intuitive at first but there is an interesting way to visualize it!
Imagine 3D space for a moment and think of the x, y and z axis. Instead of x, y and z you might as well use R, G and B as the labels for the axes and call it the RGB color space!
In that coordinate system you can display every color that is a combination of some value for R, G and B.
All those points together form a cube, going from (0, 0, 0) to (1, 1, 1): the RGB cube!
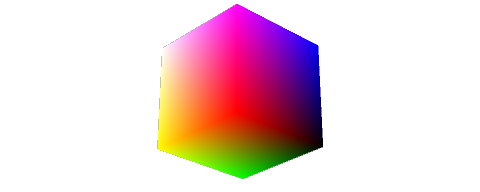 The RGB cube as seen from primary red. Black is at the origin.
(black to red: x axis, black to green: y axis, black to blue: z axis)
On that cube the color black is represented by the point at the origin and the color white is represented by the point at the opposite corner of the cube.
The HSV information is in there somewhere! If you change your point of view and look along the cube's diagonal from white to black you will see the colors appear in the order they make their appearance in the hue!
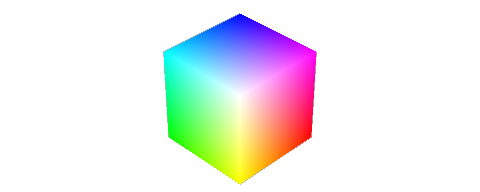 The RGB cube seen from a different perspective
Starting at red and rotating clockwise you once again see the colors red, orange, yellow, green, blue, indigo, violet.
It can be shown that the hue of any color is equal to the maximum minus the minimum of the RGB channels. This is why the function sorts the RGB channels first.
The final code to convert from RGB to HSV is written quite compactly and looks like this:
vec3 hsv(vec3 c)
{
    //Near-zero epsilon (to avoid division by 0.0)
    #define E 1e-7

    //Channel shift vector
    const vec4 S = vec4(0, -1, 2, -3) / 3.0;
    //Sort green-blue channels (highest to lowest)
    vec4 P = (c.b<c.g) ? vec4(c.gb, S.rg) : vec4(c.bg, S.wz);
    //Sort red-green-blue channels (highest to lowest)
    vec4 Q = (P.r<c.r) ? vec4(c.r, P.gbr) : vec4(P.rga, c.r);
    //Find the difference between the highest and lowest RGB for saturation
    float D = Q.x - min(Q.w, Q.y);
    //Put it all together
    return vec3(abs(Q.z + (Q.w - Q.y) / (6.0*D+E)), D / (Q.x+E), Q.x);
}
The code to convert from HSV to RGB is more straightforward. The RGB hue is calculated and then this value is mixed with white to apply the saturation. Finally that result is multiplied by the value.
vec3 rgb(float h, float s, float v)
{
    //Compute RGB hue
    vec3 RGB = clamp(abs(mod(h*6.0+vec3(0,4,2), 6.0)-3.0)-1.0, 0.0, 1.0);
    //Multiply by value and mix for saturation
    return v * mix(vec3(1), RGB, s);
}
Hue shift and saturation in YIQ color space
Another way to change the hue and saturation is by converting a color represented as RGB to YIQ and then applying a transform on that vector in YIQ space.
The Y component contains the black and white information, or the luma, and I and Q contain the color information, or the chrominance.
An interesting thing about the phase and amplitude of the chrominance contained in the I and Q components is that they correspond approximately to the hue and saturation of a color. So rotating the vector that represents the color in YIQ space corresponds to a hue shift, scaling it corresponds to a change in saturation.
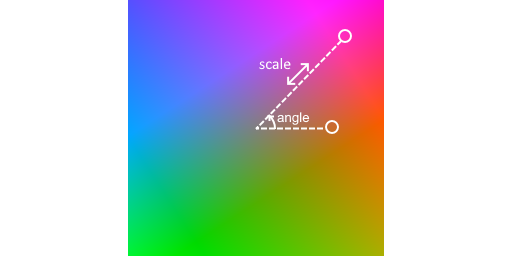
A visual representation of a hue shift and saturation scale in YIQ space (Y = 0.5)
The hue shift function first converts the input color in RGB to YIQ, then applies the rotation and scale and finally converts the result back to RGB (conversions between RGB/HSV are written as a matrix multiplication):
//Compute YIQ colour
vec3 YIQ = col * RGBtoYIQ;
//Rotate I and Q chrominance values and scale for saturation
YIQ.yz *= mat2(cos(ang), -sin(ang), sin(ang), cos(ang)) * sat;

//Convert back to RGB colour space
return YIQ * YIQtoRGB;
LUT
LUT stands for LookUp Table. Lookup tables are used to do color grading, which is a way to adjust the colors of an image as a post-processing effect.
The general idea behind a lookup table is that you use a value as an index into a table of values and then return the value that corresponds to that index. Suppose you'd want to code this in GML, then it would look something like this:
/// A lookup using structs - this one "rotates" the primary colors (R>G>B>R>G>B>...)
colors = {c_red: c_green, c_green: c_blue, c_blue: c_red};  // The lookup "table"

color = c_red;
new_color = colors[$color];
// new_color now holds the value of c_green
The lookup function
This function does the actual lookup. It takes in an index and optionally an offset to be added to the index. This index is quite a special one: it is a three-dimensional index, with R, G and B making up a dimension each.
The index is a vec3 where each of the components ranges between 0 and COLOR_NUM-1.0.
What the index really represents is a combination of three integer values but you store them as floats the entire time and use the built-in functions floor, clamp, ... to get the integer representations using the float datatype.
Since the index is three-dimensional and the texture image only two-dimensional there needs to be a way to go from three dimensions to two.
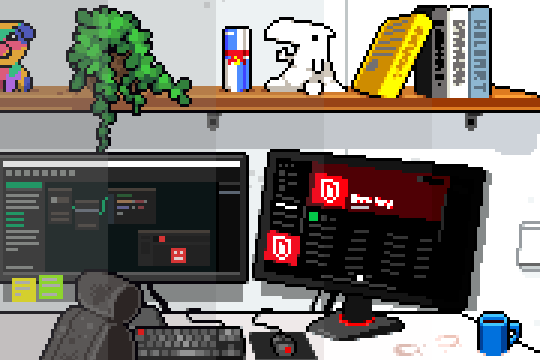
To get an understanding of how that is done, let's first look at the identity LUT image. This is the LUT image that doesn't change any color. Every color is mapped to exactly the same color.
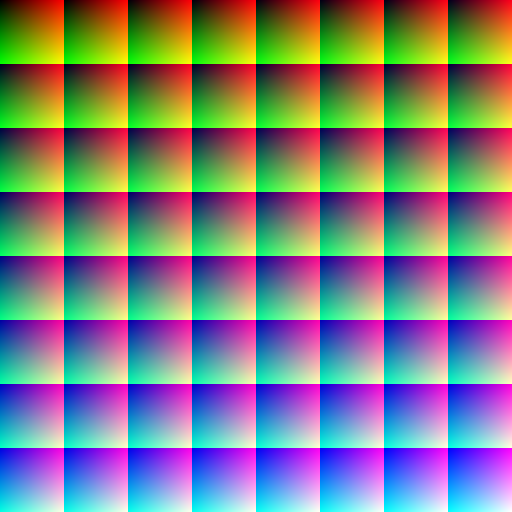 The LUT image that gives no change when applied using the LUT shader
Here the number of colors per channel (COLOR_NUM) is 64. That means that there are a total of 64 x 64 x 64 = 262144 possible ways of combining the red, green and blue component. That also happens to be the same number as the result of 512 x 512, the image's dimensions. That makes sense: for every possible combination of R, G and B you need exactly one to replace it with.
So this lookup table can store no less than 262144 colors!
If you look at the image you'll notice that it consists of squares (or cells) of 64 x 64 pixels (COLOR_NUM * COLOR_NUM). In each of those, both the red and green component are 0 in the top-left corner and increase to 1: the red one increases from left to right and the green one from top to bottom.
The blue component however cannot fit into this 2D representation so it needs to be represented in a different way. That is achieved by having a 64 x 64 cell for every possible value of blue, also 64 (COLOR_NUM) values. The 64 cells are layed out in an 8 x 8 grid (vec2 CELL_NUM).
The blue component of all pixels in the top-left 64 x 64 cell is 0. If you move to the cell to its right, the blue component increases. At the end of the row you jump to the next row, which also increases the blue component.
So the blue index increases from left to right, then from top to bottom.
All this indexing is written very compactly in the function lookup:
//Rounds the color to the nearest index and clamps it to the correct range
vec3 index = clamp(ind - off, 0.0, COLOR_NUM-1.0);
//Converts the 3D index value to 2D LUT coordinates
vec2 coord = (index.rg / COLOR_NUM + mod(floor(index.b / vec2(1, CELL_NUM.x)), CELL_NUM)) / CELL_NUM;

//Reads the color from the the LUT
return texture2D(u_LUT, coord).rgb;
Food For Thought (2) Where are black and white located on this LUT image? Why is that?
LUT interpolation
The lookup_interpolated function looks up neighboring pixels on the LUT texture and interpolates between them.
If you look at the color variable names you might notice that the naming follows a clear pattern: every variable name starts with "col" and then 3 digits for each of the RGB offsets. This is simply for finding the lower and upper bounds of each LUT cell for interpolation.
Finally the LUT boundary colors are interpolated using mix. Notice that, thanks to the naming convention of the variables, it is very clear what belongs together and which channel changes: all mix calls that use the red component as the factor see the red offset change, i.e. from col0XX to col1XX. The same is true for the green component (from colX0X to colX1X) and for the blue component (from colXX0 to colXX1).
Bringing it all together
In the fragment shader's main function the pixel color is mixed with the result of lookup_interpolated and then the vertex color is factored in.
And that is how the LUT shader maps colors to different ones!
Let's put all of that in practice!
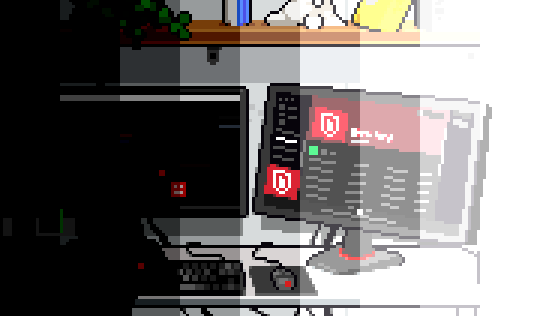
Here is a modified LUT with a green tint:

And here's how it looks in our little office scene:
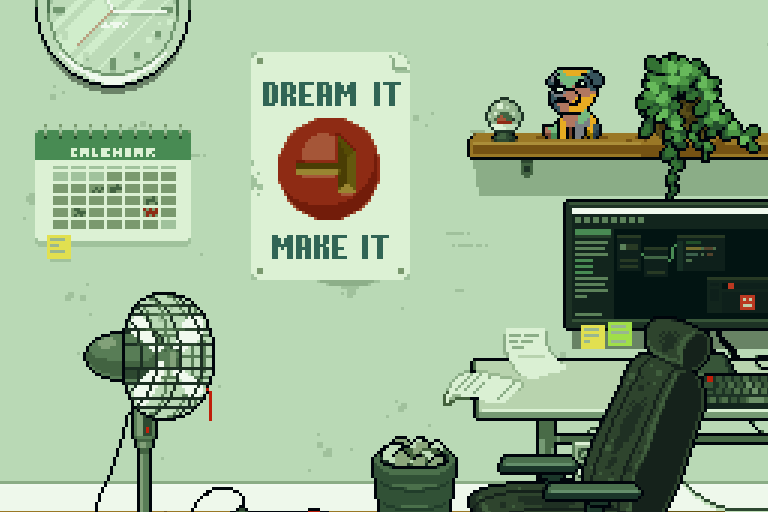 The result of applying the new LUT!
Creating your own LUT images
Firstly, they are pretty easy to find online (try Google!). This 8x8 format is fairly standard, but you can also find some in a 32x1 is also a common format. With a small adjustment to your macros, you can use those as well.
You can also use just about any image editing application such as Photoshop or GIMP. Start with a reference image and make adjustments to it until you're happy with the result, then apply those same changes to the default ("identity") LUT then that new LUT will apply those changes!
If you're feeling really adventurous you can start with the default LUT image in GM's Sprite Editor, copy it as a new sub-image and start changing pixels directly! This can be used as a palette swap shader or for any other color adjustments you can think of!
Summary
Congratulations! We went over a lot today!
You learned about brightness and contrast adjustments, about the HSV color space and the conversion between RGB and HSV and about adjusting hue and saturation by applying a transform in YIQ space.
Finally you learned about the inner workings of the LUT shader and learned how to find or generate these LUT images yourself.
Hopefully this tutorial has given you the knowledge and insights to start doing more advanced manipulations of colors using GameMaker shaders!
Answers
-
colorhas components that range from 0 to 1, since its value is assigned fromtexture2D.
If you keep that in mind, the highest value for brightness that makes a difference is 2. In that case, the second parameter tomixwill becolor.rgb + 1.0. 1 is the maximum value for a component so no matter the value of R, G or B, the pixel will be fully white anyway. There is no whiter than white.
Note though that the alpha component may be less than 1. In that case you'll see a color that is not white because the fragment color is alpha blended with a non-white destination color. -
The pixel in the top-left is fully black. The pixel in the bottom-right is fully white. You can easily verify this yourself by opening the LUT sprite in the Sprite Editor and using the color picker to verify the RGB values.